> ## Documentation Index
> Fetch the complete documentation index at: https://docs.codking.tech/llms.txt
> Use this file to discover all available pages before exploring further.
# Connect Twilio account to Shopify
## What Is Twilio, Anyway?
Twilio is a cloud communications platform that businesses use to send SMS, make calls, and manage customer messaging at scale. Think of it as the engine behind millions of automated texts you receive every day—delivery updates, OTPs, appointment reminders, and more. Instead of building messaging infrastructure from scratch, companies simply plug into Twilio's network and let it handle the delivery.
For a COD-based business, that translates into one thing: reliable, scalable SMS notifications for every order you process.
## What's In It for You?
1. **Lower Cost Per Message at Scale:** COD King's free plan works well for lower order volumes, but as your business grows, so does your messaging bill. Twilio's pay-as-you-go pricing typically works out cheaper once you're sending in bulk, so the more orders you handle, the more you save by owning your own account.
2. **More Control Over Your Sender Number:** Connecting your own Twilio account means you get your own dedicated phone number as the Sender ID. Customers see consistent messaging from the same number every time, which builds familiarity and trust—and reduces the chance your texts get mistaken for spam.
3. **Better Delivery Reliability:** Twilio operates a global carrier network built specifically for high-volume, time-sensitive messaging. That means fewer delays and drops during peak order periods—exactly when you need notifications to land on time.
4. **Transparent Usage Tracking:** Once connected, you can monitor your own Twilio console for delivery logs, spend, and message history. That level of visibility is hard to get on a shared, default provider.
5. **Room to Grow:** As your order volume scales, your Twilio setup scales with it. There's no need to re-platform or renegotiate—you just top up your wallet and keep going.
## How to Connect Twilio to COD King
### Step 1: Create Your Twilio Account
Start by [signing up for Twilio](http://www.twilio.com/referral/1CwBKG). It's free to create an account, and you'll just need to verify your email to get going.
### Step 2: Grab Your Credentials
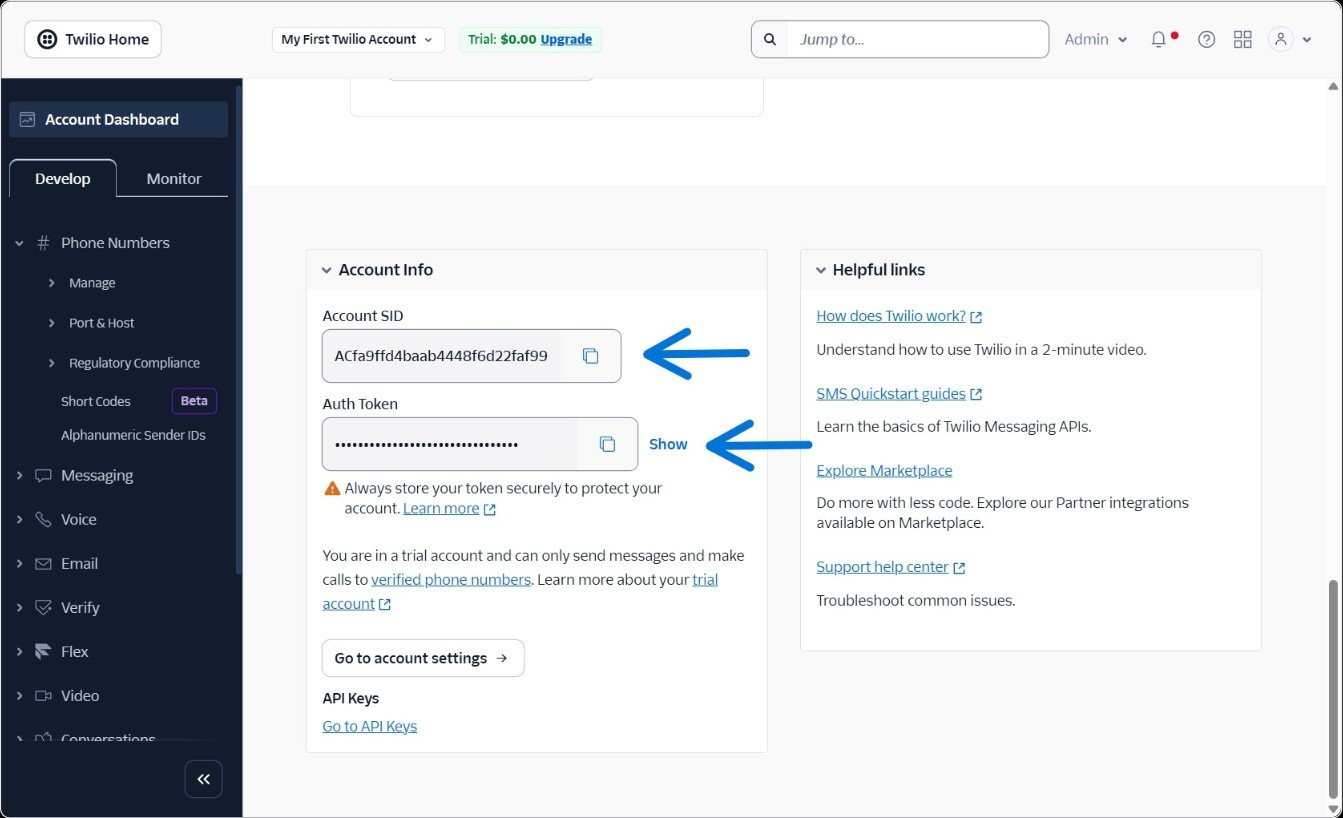
Once you're verified, log in and head to the [Twilio Console](https://console.twilio.com/). Right there on your dashboard, you'll find two key pieces of information:
* **Account SID**
* **Auth Token**
Copy **Account SID & Auth Token**—you'll need them in the next step.
 ### Step 3: Plug Twilio Into COD King
Now switch over to your COD King dashboard:
1. Go to **Local SMS provider**
### Step 3: Plug Twilio Into COD King
Now switch over to your COD King dashboard:
1. Go to **Local SMS provider**
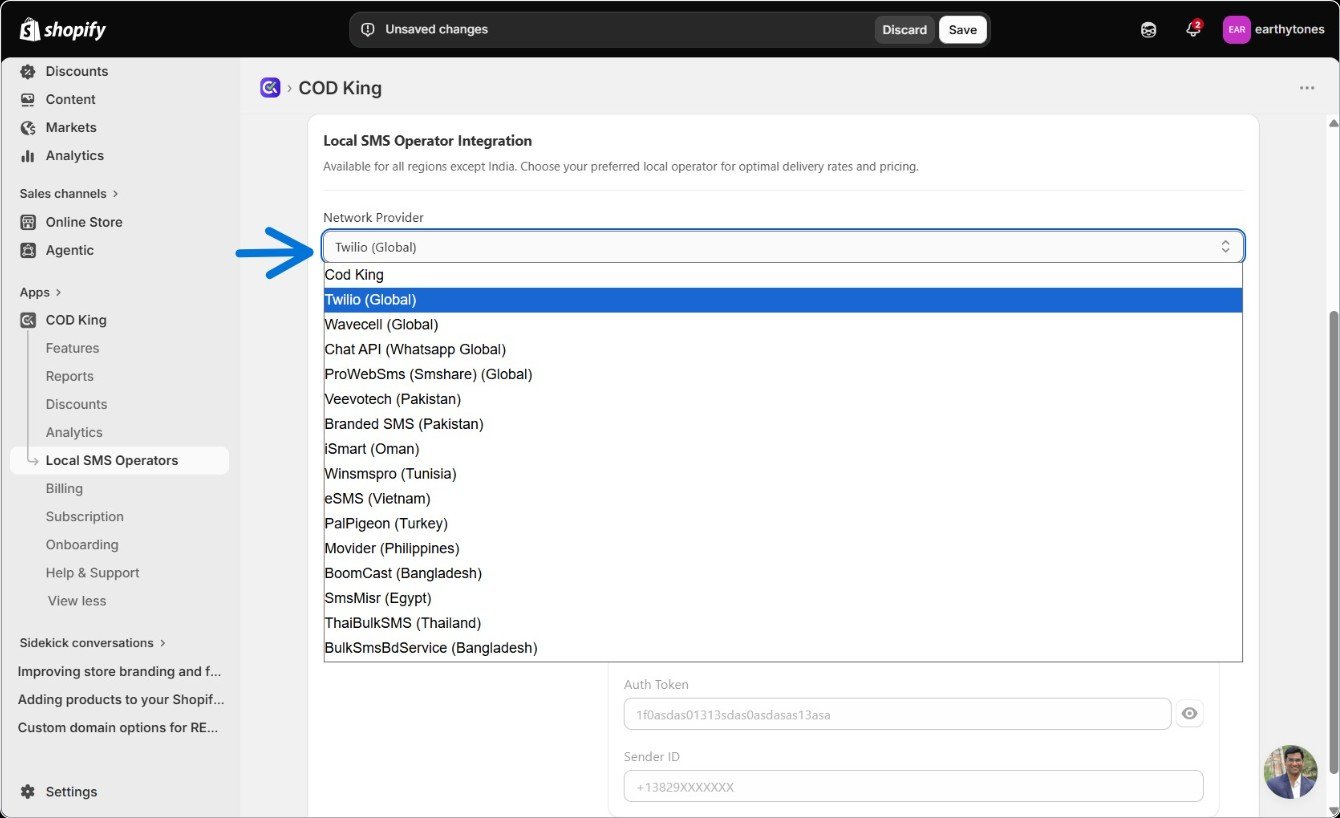
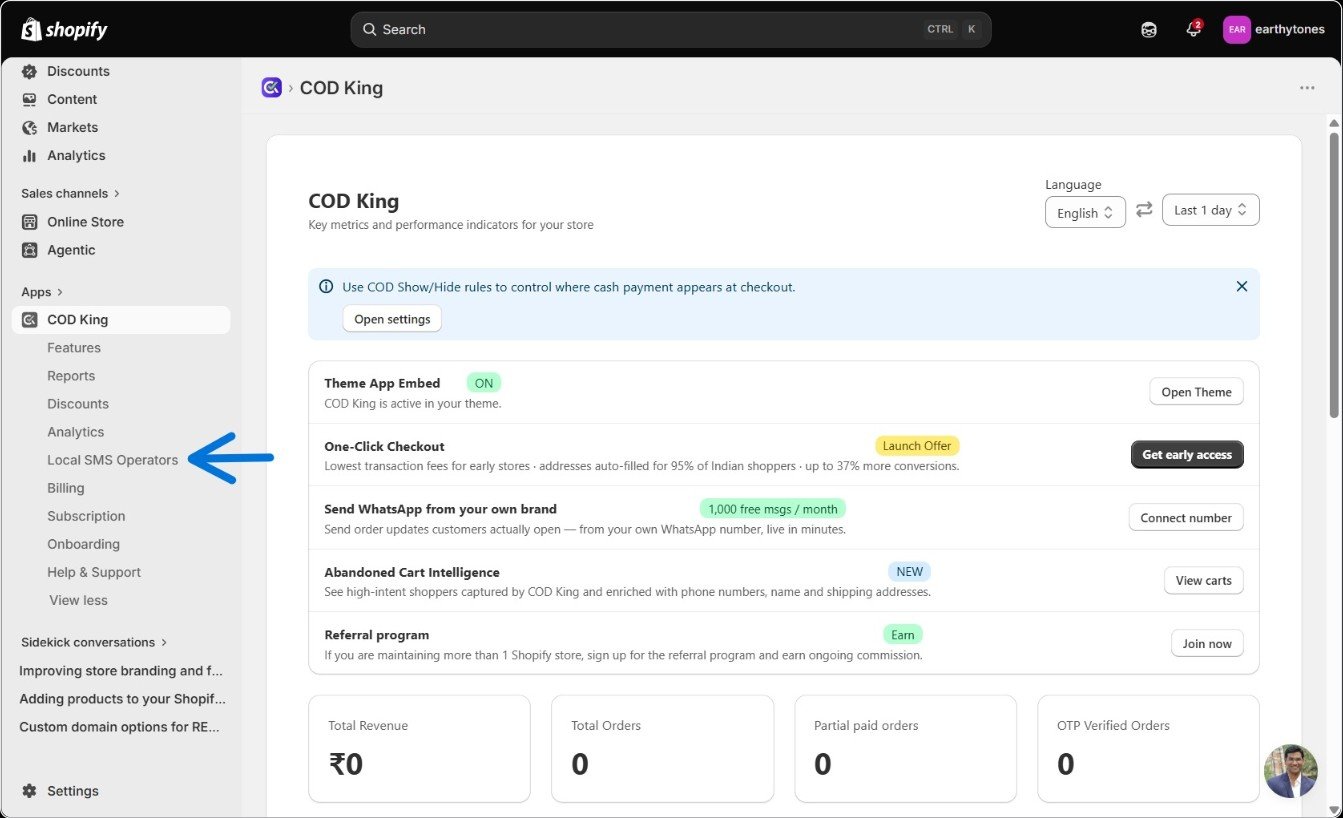 2. Scroll down and choose **Twilio (Global)** from the Network Provider dropdown
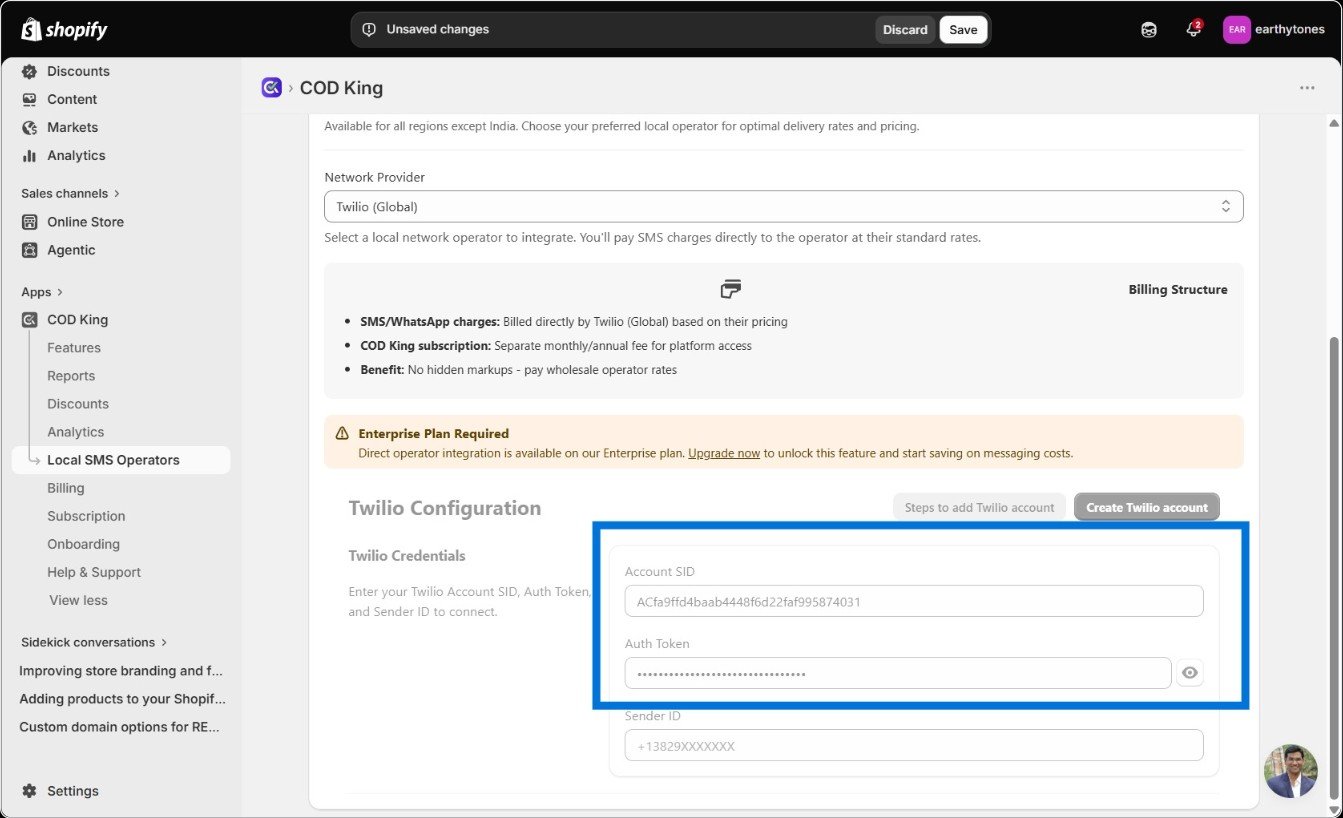
 3. Paste in your **Account SID** and **Auth Token**
 ### Step 4: Buy a Phone Number
Head back to Twilio and go to **Phone Numbers → Manage → [Buy a Number](https://console.twilio.com/us1/develop/phone-numbers/manage/search?frameUrl=%2Fconsole%2Fphone-numbers%2Fsearch%3Fx-target-region%3Dus1\¤tFrameUrl=%2Fconsole%2Fphone-numbers%2Fsearch%3FisoCountry%3DUS%26types%255B%255D%3DLocal%26types%255B%255D%3DTollfree%26capabilities%255B%255D%3DSms%26capabilities%255B%255D%3DMms%26capabilities%255B%255D%3DVoice%26capabilities%255B%255D%3DFax%26searchTerm%3D%26searchFilter%3Dleft%26searchType%3Dnumber%26x-target-region%3Dus1%26__override_layout__%3Dembed%26bifrost%3Dtrue)**. Pick your country, make sure SMS capability is selected, and choose any number you like. Confirm the terms and complete the purchase.
### Step 4: Buy a Phone Number
Head back to Twilio and go to **Phone Numbers → Manage → [Buy a Number](https://console.twilio.com/us1/develop/phone-numbers/manage/search?frameUrl=%2Fconsole%2Fphone-numbers%2Fsearch%3Fx-target-region%3Dus1\¤tFrameUrl=%2Fconsole%2Fphone-numbers%2Fsearch%3FisoCountry%3DUS%26types%255B%255D%3DLocal%26types%255B%255D%3DTollfree%26capabilities%255B%255D%3DSms%26capabilities%255B%255D%3DMms%26capabilities%255B%255D%3DVoice%26capabilities%255B%255D%3DFax%26searchTerm%3D%26searchFilter%3Dleft%26searchType%3Dnumber%26x-target-region%3Dus1%26__override_layout__%3Dembed%26bifrost%3Dtrue)**. Pick your country, make sure SMS capability is selected, and choose any number you like. Confirm the terms and complete the purchase.
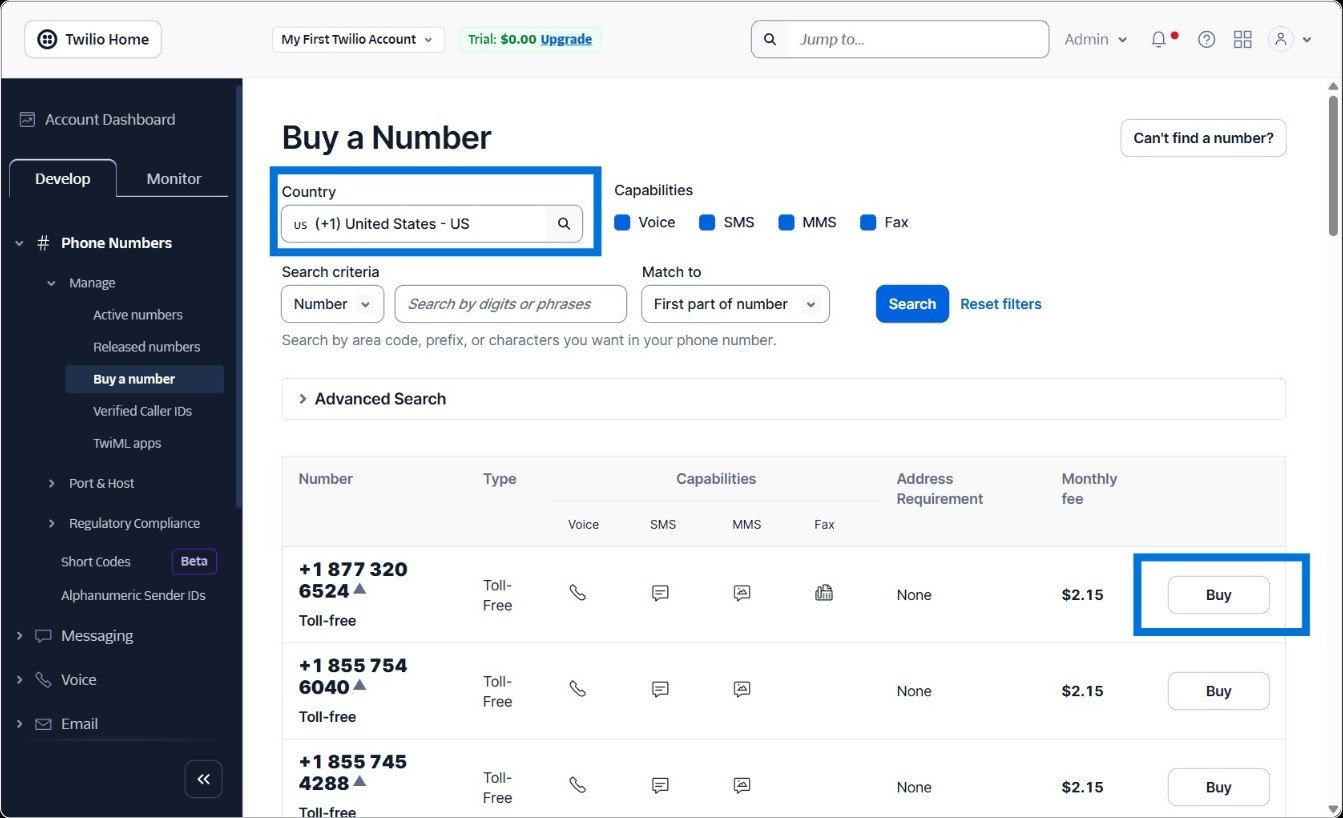 If Twilio prompts you for an emergency address, feel free to add one—it's optional but good practice.
### Step 5: Set Your Sender ID
Copy the number you just purchased (strip out any spaces), then paste it into the **Sender ID** field back in COD King's network settings.
### Step 6: Fund Your Twilio Wallet
Almost there. Go back to your [Twilio Console](https://console.twilio.com/?frameUrl=/console) and click **Upgrade** at the top. Fill in your billing details, add your tax information, and load your wallet with however much you'd like to start with.
**Pro tip:** Turn on auto-recharge. It's a small setting that saves you from ever having a notification fail because your balance ran dry mid-campaign.
### Step 7: Test, Save, and Go Live
Before you fully commit, send yourself a test SMS from the **Settings** tab in COD King to confirm everything's wired up correctly. Once it lands in your inbox, head to the **Subscription** tab, pick a plan that matches your order volume, and hit subscribe.
Last but not least—save **your changes**. It's a small click that's easy to forget after all that setup.
If Twilio prompts you for an emergency address, feel free to add one—it's optional but good practice.
### Step 5: Set Your Sender ID
Copy the number you just purchased (strip out any spaces), then paste it into the **Sender ID** field back in COD King's network settings.
### Step 6: Fund Your Twilio Wallet
Almost there. Go back to your [Twilio Console](https://console.twilio.com/?frameUrl=/console) and click **Upgrade** at the top. Fill in your billing details, add your tax information, and load your wallet with however much you'd like to start with.
**Pro tip:** Turn on auto-recharge. It's a small setting that saves you from ever having a notification fail because your balance ran dry mid-campaign.
### Step 7: Test, Save, and Go Live
Before you fully commit, send yourself a test SMS from the **Settings** tab in COD King to confirm everything's wired up correctly. Once it lands in your inbox, head to the **Subscription** tab, pick a plan that matches your order volume, and hit subscribe.
Last but not least—save **your changes**. It's a small click that's easy to forget after all that setup.